Getting started
Approvals in blink i are a structured sign-off layer that sits between a team member creating a record and that record becoming active. Workflows define who must approve, in what order, and under what conditions — so nothing is confirmed without the right eyes seeing it first.
1.2 — What needs approval
Three types of records in blink i go through an approval workflow before they are confirmed:
| Module | What is approved | Where submitted |
|---|---|---|
| Bookings | A property booking before the sale is confirmed and the payment schedule activates. | Bookings › Submit for Approval |
| Expenses | An expense record before it is cleared for payment. | Finance › Expenses › Save & Submit |
| Purchase Orders | A PO before goods can be ordered and an expense auto-created. | Procurement › Purchase Orders › Submit for Approval |
Each of these uses its own configurable workflow — you can have a two-step booking approval and a single-step expense approval running independently. Workflows are set up by workspace administrators under Settings › Approval Workflows.
1.3 — Approval request states
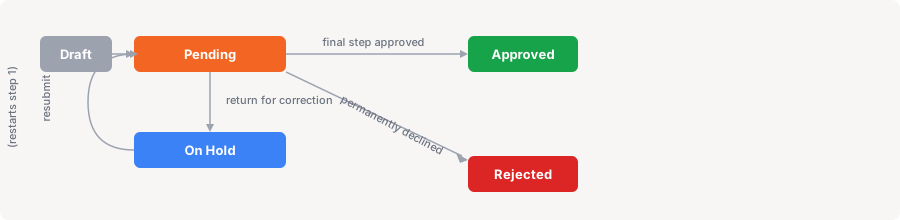
Every approval request (the object moving through the workflow) has a state that describes where it is in the process:
| State | Meaning |
|---|---|
| Draft | The record exists but has not been submitted yet. No approval request is open. |
| Pending | The request has been submitted and is waiting for the current step's approver to act. |
| On Hold | Returned to the submitter for corrections. The approver has asked for changes before they will sign off. |
| Approved | All steps in the workflow have been completed. The record is confirmed and active. |
| Rejected | Permanently declined. The record cannot be resubmitted — a new record must be created if needed. |
My Approvals
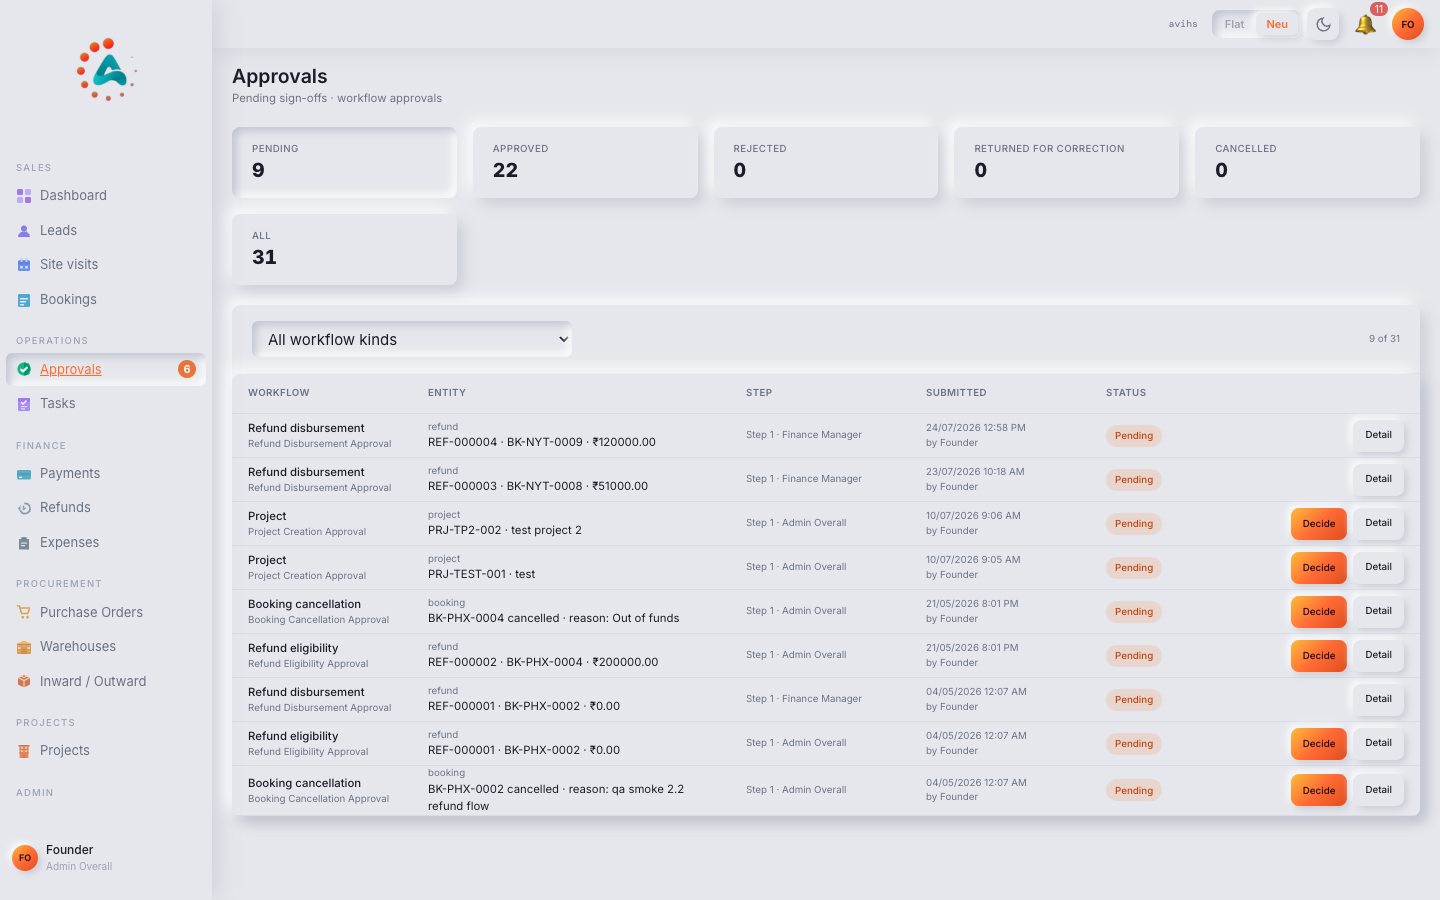
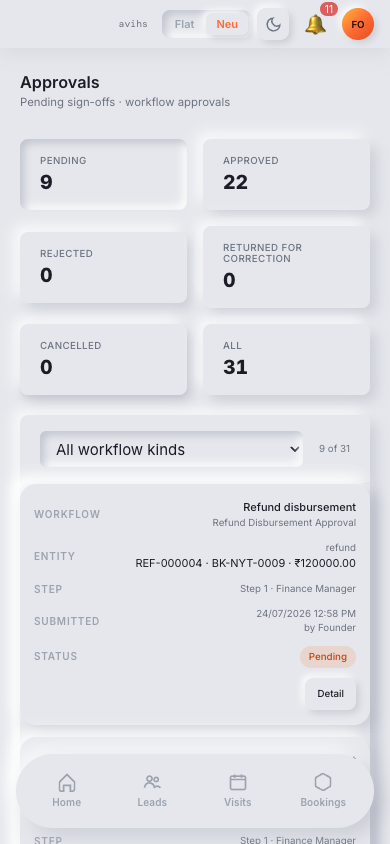
If you are configured as an approver on any workflow, your pending queue appears in two places: the Pending Approvals tile on the Home Dashboard, and Approvals › My Approvals in the sidebar.
 Web
Web
 Mobile
2.1 — The approval queue
Approvals › My Approvals lists every request currently waiting for your decision. The list is split by module — Bookings, Expenses, Purchase Orders — with a count badge on each tab showing how many are pending.
| Column | What it shows |
|---|---|
| Reference | The record's ID (e.g. BK-0018, EXP-042, PO-007). Click to open the full detail. |
| Type | Booking, Expense, or Purchase Order. |
| Submitted by | Who created and submitted the request. |
| Amount / Value | The monetary value — sale value for bookings, total for expenses and POs. |
| Project | Which project the record belongs to. |
| Submitted on | When the request arrived at your step. Older requests are shown first by default. |
| Step | Which step of the workflow this is (e.g. Step 1 of 2). |
| Actions | Review opens the full detail for decision; Approve approves inline without opening the detail. |
2.2 — Reviewing a request
Click Review on any row to open the full record. What you see depends on the record type:
- Booking — customer details, property (plot/unit, project), agreed sale value, payment plan, KYC completion status, uploaded documents, and the submitter's notes. See the Bookings guide for field definitions.
- Expense — vendor, project, category, line items, total amount, payment mode, and any supporting attachments. See the Procurement guide.
- Purchase Order — vendor, project, SKUs, quantities, unit prices, total, expected delivery date, and expense category. See the Procurement guide.
The Approval History panel at the bottom of the detail shows every previous step — who approved it, when, and any comments they left. Review this before acting if the request has passed through earlier steps.
2.3 — Approve, return for correction, reject
From the review detail (or via the inline actions on the queue list), three decisions are available:
| Action | When to use | What happens |
|---|---|---|
| Approve | Everything looks correct. You are satisfied with the record and authorise it. |
If this is the final step: the record moves to Approved and becomes active — booking is confirmed, expense is cleared for payment, PO can be ordered against. If more steps remain: the request moves to the next approver, who is notified immediately. |
| Return for Correction | Something needs fixing — wrong amount, missing document, incorrect details — but the record can be salvaged. | The record moves to On Hold. Your comment is required and sent to the submitter. The submitter edits the record and resubmits, restarting the workflow from step 1. |
| Reject | The request should not proceed at all — policy breach, duplicate, or the underlying transaction is not authorised. | The record moves to Rejected permanently. A comment is required explaining the reason. The submitter is notified. A new record must be created if the work needs to proceed. |
2.4 — Bulk approval
When multiple low-value or routine requests are pending (e.g. a batch of small expenses that all look correct), you can approve several at once without opening each one:
- On the My Approvals queue, check the boxes on the left of the rows you want to approve.
- A selection bar appears at the bottom of the screen showing the count selected and an Approve Selected button.
- Click Approve Selected and confirm. All selected requests are approved in one action.
- Bulk approval is only available for the final approval step — requests that still have further steps after your approval are not eligible for bulk action.
Submitting for approval
For team members who create bookings, expenses, or purchase orders — here is what happens when you submit, how to track your request, and what to do if it comes back to you.
3.1 — How to submit
Each module has its own submission trigger:
| Module | How to submit | Pre-submit check |
|---|---|---|
| Booking | Open the booking detail → Submit for Approval. | All KYC fields filled, all required documents uploaded. |
| Expense | In the create modal → Save & Submit; or open a Draft → Submit for Approval. | Project, category, and at least one line item. |
| Purchase Order | In the create modal → Save & Submit; or open a Draft PO → Submit for Approval. | Vendor, project, and at least one SKU line item. |
If the pre-submit check fails, blink i highlights the missing fields in red and does not submit. Fix the gaps and try again. On successful submission:
- The record's status moves to Pending.
- The first approver in the workflow is notified by in-app notification and email.
- You can no longer edit the record while it is pending — editing is locked until the approver acts.
3.2 — Tracking your submission
After submitting, open the record to see the Approval Progress panel. It shows:
- Each step in the workflow, in order.
- Which step is currently active (highlighted with a spinner).
- Completed steps showing the approver's name, their decision, and the timestamp.
- The approver assigned to the current step — so you know who to follow up with if the request is taking too long.
You can also see all your pending and recently decided submissions under Approvals › My Submissions.
3.3 — Handling a return (On Hold)
If an approver returns your request, you will receive a notification with their comment. The record moves to On Hold and becomes editable again. To fix and resubmit:
-
Read the approver's comment — it appears in the Approval History panel on the record. Understand exactly what needs to change before editing.
-
Make the corrections — edit the record. For bookings, this might mean uploading a missing document. For expenses or POs, it might mean correcting a line item amount or category.
-
Resubmit — click Submit for Approval again. The workflow restarts from step 1, even if the previous return came from step 2. All approvers are notified fresh.
Workflow configuration
Workspace administrators configure approval workflows under Settings › Approval Workflows. This chapter is for admins setting up or modifying workflows — agents and approvers do not need to read this section.
4.2 — Creating a workflow
Navigate to Settings › Approval Workflows and click + New Workflow. Fill in the workflow header:
| Field | Notes |
|---|---|
| Workflow Name | A clear internal name, e.g. "Booking Approval — Standard" or "Expense Approval — High Value". |
| Applies To | Which module this workflow handles: Bookings, Expenses, or Purchase Orders. One workflow covers one module. |
| Active | Toggle on to make the workflow live. Only one workflow per module can be active at a time. |
| Description | Optional — internal note on what this workflow is for and when it applies. |
Click Save to create the workflow shell. Then add steps (see 4.3) and conditions (see 4.4) before activating.
4.3 — Steps & approvers
A workflow is made up of one or more sequential steps. Each step has one or more approvers — all must approve before the request advances to the next step.
On the workflow detail, click + Add Step to add a step. Configure each step:
| Field | Notes |
|---|---|
| Step Name | E.g. "Sales Manager Review", "Finance Head Approval". Shown to submitters in the Approval Progress panel. |
| Approvers | One or more users who must approve this step. Select by name from active workspace members. |
| Approval Mode | Any one — the step passes when any one of the listed approvers approves. All — every listed approver must approve before the step passes. Use Any one for resilience; use All for high-stakes joint sign-off. |
| Step Order | Drag steps to reorder. Requests move through steps in the order shown, top to bottom. |
4.4 — Conditions & value thresholds
Conditions let a workflow apply only to certain records — by value, by project, or by category — so routine low-value items can bypass steps that only matter for larger amounts.
On any step, click Add Condition to scope when that step fires:
| Condition type | Example |
|---|---|
| Amount > threshold | "Only require Finance Director approval when expense total exceeds ₹1,00,000." |
| Amount ≤ threshold | "Only require Sales Manager for bookings under ₹50L — higher values go straight to the Director." |
| Project matches | "This step only applies to bookings in Project Alpha." |
| Category matches | "This step only fires for expenses categorised as Civil Work." |
A step whose conditions are not met is skipped automatically — the request advances to the next step that does match, or is approved immediately if no further steps apply.
4.5 — Escalation
Escalation automatically reassigns or chases a request if an approver has not acted within a set time. Configure it on each step:
| Setting | Notes |
|---|---|
| Reminder after | Hours after assignment before the approver receives a reminder notification. E.g. 24 hours. |
| Escalate after | Hours after assignment before the request is escalated to the escalation contact. E.g. 48 hours. |
| Escalation contact | The user who receives the escalation — typically the approver's manager. They can then approve or reassign. |
| Auto-approve after | Optional — if set, the step is automatically approved after this many hours with no action. Use with caution and only for very low-risk steps. |
Per-module approval details
Each module has specific things to check when reviewing. Here is what to look for in each type of approval request.
5.1 — Booking approvals
When reviewing a booking approval request, verify the following before approving:
| Check | Where to find it |
|---|---|
| Customer identity confirmed | KYC tab — PAN, Aadhaar, and address proof uploaded and legible. |
| Plot / unit is correct | Property panel — the right plot number in the right project. Cross-check against any verbal agreements. |
| Sale value is correct | Pricing panel — matches the approved pricing configuration or has an authorised discount. |
| Payment plan is appropriate | Payment Schedule tab — the plan matches what was agreed with the customer. |
| Booking form signed | Documents section — the signed booking form PDF is uploaded. |
| Agent is correct | The agent who closed the sale is listed — important for commission tracking. |
If everything checks out, click Approve. The booking is confirmed, the plot is marked sold, and the payment schedule activates.
5.2 — Expense approvals
When reviewing an expense, check:
- Project and category are correct — the expense will post against this project's budget item. A wrong category distorts budget reporting.
- Line items are reasonable — quantities, units, and unit prices look right for the type of spend.
- Total is within the submitter's authorisation limit — your organisation's policy may require higher approval above certain amounts.
- Supporting attachment is present — invoice, receipt, or bill attached and matches the claimed amount.
- Vendor is correct — not a personal account or an unrecognised payee.
5.3 — Purchase Order approvals
When reviewing a PO, check:
- Vendor is approved — the vendor should be in the system and an authorised supplier for the goods being ordered.
- SKUs and quantities are reasonable — the items match the project's current needs. Verify against the project's Development / Budget if in doubt.
- Unit prices are market-rate — flag significant deviations from the last purchase price for the same SKU.
- Expense category is correct — the auto-created expense will post to this category.
- Expected delivery date is realistic — check it does not conflict with site schedules.
On approval, blink i immediately creates a linked expense and lists the PO under Inward / Outward › Pending POs ready for goods receipt.
Notifications
blink i notifies everyone involved in an approval request at each transition — so no one needs to chase for an update manually.
6.1 — When notifications are sent
| Event | Who is notified |
|---|---|
| Request submitted | Step 1 approver(s) — in-app notification and email. |
| Step approved, more steps remain | Next step's approver(s) — in-app notification and email. |
| Final step approved | Submitter — in-app and email confirming the record is now approved. |
| Returned for correction | Submitter — in-app and email with the approver's comment. |
| Rejected | Submitter — in-app and email with the rejection reason. |
| Escalation reminder | Current step's approver(s) — a reminder that the request is waiting. |
| Escalated | Escalation contact — notification that the request has been escalated to them. |
In-app notifications appear as a badge on the bell icon in the top-right corner of blink i. Click the bell to see all recent notifications. Email notifications go to the address associated with your blink i account.
noreply@blink-i.app is in your email allowlist. Notification preferences can be adjusted in Settings › My Account › Notifications.The full approval flow
A two-step booking approval — the most common configuration — from submission to confirmation.
-
Agent creates and completes the booking — fills in customer details, selects the plot, sets the sale value and payment plan, completes KYC and uploads all required documents. Booking is in Draft.
-
Agent submits for approval — clicks Submit for Approval. blink i validates completeness. On success, the booking moves to Pending and the Step 1 approver (Sales Manager) is notified.
-
Sales Manager reviews — opens the booking from Approvals › My Approvals. Checks the KYC documents, plot, sale value, and agent. Everything looks correct — clicks Approve.
-
Step 2 approver is notified — the Finance Director receives an in-app and email notification. The booking is now at Step 2 of 2.
-
Finance Director reviews — checks the pricing, payment plan, and that the KYC is complete. Returns the booking: "PAN card image is blurry — please re-upload." Booking moves to On Hold.
-
Agent corrects and resubmits — receives the return notification, uploads a clear PAN scan, and clicks Submit for Approval again. The workflow restarts from Step 1.
-
Both steps approve on the second pass — Sales Manager approves (Step 1), Finance Director approves (Step 2, final). The booking moves to Approved.
-
Booking is live — the agent and customer are notified. The plot is marked sold. The payment schedule activates and the first instalment shows as Due.
The same pattern applies for expenses and purchase orders — the module and the fields differ, but the submit → review → approve / return → resubmit cycle is identical across all three.